Browsing "Older Posts"

moravian star ornament with free pattern

By Hatun Comak → Saturday, September 26, 2020


Here is a beautiful ornament called moravian star 

 The moravian star ornament looks complicated and tedious at first to make but the detailed instructions with photographs will help you figure out how to manage points and seams. When you prepare diamonds just start sewing them together and you will find out your way. The moravian star ornament is so nice and elegant that it worths making one. Besides, with right colour choices you can make it a Christmas ornament. It is also a perfect ornament to be gifted.


I have seen that beautiful moravian star ornament around and wanted to give it a try. The result is here. I think I have managed it well and to be honest, until the last pieces to add, I was not sure if I could make it successfully but it turned out well. So here it is! I also prepared a tutorial for you.

You will need:

60 1" diamond paper pieces. CLICK HERE TO DOWNLOAD DIAMONDS TEMPLATE

The moravian star ornament finishes at 4" x 4 3/4"


Instructions

  • Download and print out the diamond templates. You will need 60 diamomds for a moravian star ornament.
  • Choose your fabric. I prefered green and red fabrics so that I can use it for Christmas. 
  • Lay out five diamod templates on the wrong side of fabric. You need five pieces to make identical one face of the star. You should use 1/4" seam allowance so arrange the templates accordingly.

  • Glue each paper down. The papers are going to stay in the stars for durability and stability. Cut the pieces with 1/4" seam allowance.
  • Glue the seam allowances. Flying tails may be a burden while sewing the pieces together, so folding tips may be good, but still they do not prevent you sewing diamonds  together.

  • Lay out five diamonds. Pay attention to the direction it goes. It will look like a star with a gap.  First sew two diamonds together and add one each time, until you sew five pieces. 


  • The last space gets pulled together and when you sew them you will have a basket-like shape with five stars point, as in the  image below.

  • You need to make 12 basket- like shapes, which is needed for a moravian star ornament.
  • Now it is time to join the basket-like pieces together. This time the stitching is on the outside. So the  stitches will be visible. You had better choose a matching thread.


  • Start sewing a pair and add one piece at each time. From the beginning and while sewing the pieces together, I felt that it wouldn't come together. However, pieces come together in the end to make a moravian star ornament. While adding pieces, just notice that each tip of the star has three diamonds coming together to form the point.


  • I added a hanging ribbon while sewing the last corner. 
I am pretty happy with the result. Although this is my first trial, I think I managed it well. I was suspicious while sewing the pieces together that it may not come together but it turned out well.


It is such an elegant ornament that I want to make more. But making a moravian star ornament is not a simple project to make. It takes time but worth it!
I would like to make one more with rainbow colors but I am not sure when.
It is your turn, just dig out your Christmas fabric  stash and start making your own moravian star ornament. Maybe it will  be placed at the top of  your christmas tree.

DIY fabric bookmark tutorial

By Hatun Comak → Saturday, September 19, 2020


Get your favourite fabric with a piece of ribbon and a little time for sewing, then you have the perfect way to mark your book page. Once you make one and see how easy it is, you will want to make many of them. It is a perfect gift for book lovers.


I prepared an easy step by step tutorial to make a fabric heart bookmark. So you can make your bookmarks and can be gifted for any special day.


Here we go!

Materials

  • Two pieces of fabric measuring 3" x 8"
  • Fusible interfacing measuring 2.5"× 7.5"
  • A piece of ribbon

Instructions

  • Cut two pieces of fabric into 3" x 8" and one piece of fusible interfacing, a little smaller than your fabric.

  • Place the interfacing on one of the wrong side of the fabric piece and press with iron until the fusible interfacing is attaches.


  • Center the ribbon on the rights side of the top of the fabric piece and pin it. You can see it on the image below.
  • Place the fabric pieces right sides together.
  • Sew all around the fabric piece except the part you left for turning. Cut the corners and extra ribbon.


  • Turn it right side out. Iron it and straight stitch all around the bookmark. This gives it a finished look. You are finished now. 

DIY fabric bookmarks are great also as gifts. Choosing the right colors, you can make gifts for upcoming Halloween, Christmas, Valentine's Day and some other special days. You even do not need a special day to give gifts. These fabric bookmarks are easy and practical to make. It takes ten minutes to finish one. It is also a great scrap buster. 
I also made another fabric bookmark, this time adding a heart on the tip of the ribbon. It also looks lovely. 


While making a fabric bookmark, you can add just a ribbon, or any shape you like or you can add applique on the bookmark.

Enjoy it!


how to make no-waste flying geese for quilts

By Hatun Comak → Monday, September 14, 2020


Flying geese quilt block is simple and quick to make and versatile. You can make a single quilt with flying geese quilt block or match it with another quilt block. It can either stand alone as a single block to make a quilt or be used to make some other quilts. Or it can just be used to complete a quilt such as borders. So it is a good idea to learn more about flying geese quilt block which is a useful, practical quilt pattern.

There are many methods to make flying geese, even with paper piecing method you can make flying geese. Here I prepared a tutorial to show how to make no waste flying geese quilt block. In this method there is no fabric wasted and you male four flying geese at one time . This technique is practical when you need to make many identical flying geese.

Below is the video showing how to make no-waste flying geese.


Steps to make no-waste flying geese

  • Cut the fabric. Flying geese are rectangular units, twice as wide as they are high. Cut a square which is 1 1/4" larger than the finished width of the flying geese. For example if you need 3x6" flying geese, cut 7 1/4"×7 1/4" square. For side triangles cut four squares measuring 3 7/8"× 3 7/8" (7/8" larger than the finished height of your flying geese).
So you have 1 large square and four small squares as measured above. Here I have 5" large square and 3 3/4" small squares. Below is a list showing cutting instructions for flying geese in various size.


  • Draw a diagonal line on the back of each of four small squares.
  • Place two squares on the large square, right sides together and small squares in opposite corners. All the edges should be aligned. Pin the small squares in place.

  • Sew two seams each of which is 1/4" away from the mearked lines. Press flat with iron.


  • Cut the unit in half on the drawn line.


  • Press the triangles open. 


  • Place the two units in front of you . Place a small square in the corner of each unit, right sides together. Position the marked lines as shown in the photo below.

  • Sew two seams each 1/4" away from the marked line to add the new squares as you did for the first squares. Press with iron.


  • Cut each unit along the drawn line. Press thr triangles open to create four flying geese.

  • Each of the flying geese quilt block should be 1/2" taller and larger wider than the finished size of flying geese in your quilt. Press the triangles open and trim the dog ears. Now they are ready.

No-waste flying geese units are perfect for making Sawtooth Star Quilt Blocks. They make perfect quilts. You can reach the tutorial for Sawtooth Star Quilt Block HERE.


Below are some examples of quilts made by using flying geese quilt block. These quilts are stunning and also modern. The possibilities of quilt patterns are endless. Just find your favourite one and start making it.


miniature hexagon flower (1/4") tutorial with free template

By Hatun Comak → Wednesday, September 9, 2020


Hexagons are one of the most popular patterns among english paper piecing lovers, so is mine. Depending on the project I have been working on, I use various hexagons in various size but this is the first time I have made such tiny hexies. They are 1/4". I must say it is tedious and a little bit fussy but when you finish making a hexagon flower, it is lovely and adorable. 


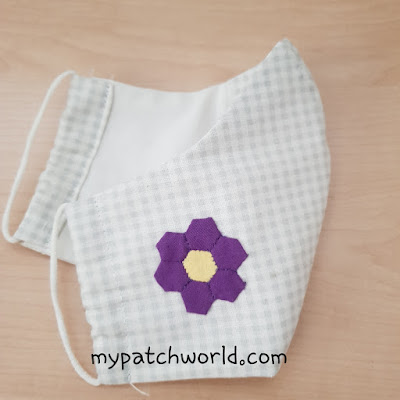
Look how tiny these hexagon flowers are! I started sewing these 1/4" hexagon flowers without any plan on mind. I thought, well I should  give it a try. And I like the result, 1/4" hexagon flowers are lovely. The first one I made was appliqued on a face mask. 

These tiny hexagons are not only cute but also perfect for your trash. You can make and put them away to applique on a face mask, zipper pouch, a bag or even you can make a whole quilt.


So here I tell how I sew tiny hexgon flowers with useful tips. 

Instructions


  • Print out and cut the hexagon pieces. For a hexagon flower you need seven hexagons.


  • Place the template on the wrong side of the fabric and cut around the hexagon with 1/4" allowance. If you make allowance smaller, it will be harder to work with.

  • Start basting hexies. I prefer thread basting. You can watch the video tutorial below also to see how to baste 1/4" hexagons.


  • When you finish basting seven hexagons, it is time to attach them to make a nice tiny hexagon flower.


  • Make sure you line up edges nicely. The first stitch should start from the corner. The stitches should be closer to the edge so that they can't bee seen. You stitch till the other corner, go back one stitch to tie off and cut off the thread.

  • Continue the same process adding other hexagons to make the flower. You sew the center hexagon last. You can also watch the video below to see how to make hexafon flower.


  • When you finish sewing hexagon, press with iron and if you are going to use the tiny hexagon flower for appliqu, pull out the basting stitches. Gently pull away the papers and it is ready for applique.

I hope you get the inspiration to start your own project. These tiny hexagon flowers are lovely and worth trying.

Enjoy it!


face mask with hexagon flower applique

By Hatun Comak → Thursday, September 3, 2020


 We the quilters have been busy sewing DIY face masks for ourselves, family, friends and  even for hospitals since the quarantine started. We know that fabric face masks are not as effective as N95 masks but highly protective when you choose %100 cotton and tightly woven fabric. So it is better than nothing.


Since it is obligatory to wear masks, it is a good idea to make the masks for yourself. Fabric face masks are practical and washable, so you can use them for a long time.

As you might have seen, there are dozens of face mask patterns. I have tried some different face mask patterns but this pattern of CraftPassion is the best, it fits your face well and it has a nose wire. I used soft elastic which does not hurt ears. You can reach the free pattern HERE

Tadaa, the best part of making the fabric mask is adding it a tiny hexagon flower, which I liked most and wanted to share it with you. I used 1/4" hexagons for this hexagon flower. This is the first time I have ever made such a tiny hexagon flower. It is tedious but adorable and I loved the result.


I appliqued  the hexagon flower on the front piece, before I sew the mask.


 Then I completed sewing mask and added the nose wire and elastic loops.


As a quilter you can also add some applique to your mask, so that you can show off your quilting skills. What is more, it makes making masks more enjoyable.

I enjoyed making the mask. Hope you get the inspiration.